Completed Charmed Prints QAL Quilts

A Charmed Prints QAL finish!  I hope you have enjoyed the Charmed Prints Quilt Along.... today is the official day to show off your finish (or close-to-finish if you have a quilt top!).  I enjoyed putting this quilt along together and watching each person's take on the design pop up in the flickr group.  Thank you to everyone who is participating.  In my opinion, the best thing about this QAL was the ability to customize it.  Each person made their version completely unique.

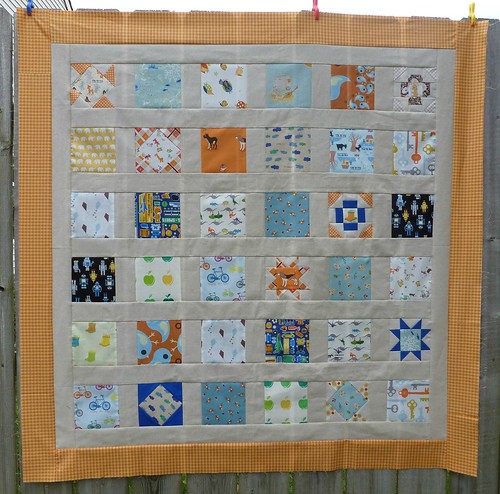
Here's my finish:
Is that orange calling you?  It didn't start out as an orange quilt in my mind, but I love how the orange accents in the prints are picked up.  I think I have a new found love for gingham.

The Fussy Cut Feature Blocks:

STAR


GREEK CROSS


DIAMOND


PINWHEEL

If  you look closely, you can see I had a rotary cutting misfire here on my last pinwheel.  I couldn't bear to omit that little dear, so I did my best to salvage the block.  By far, the one with the most problems... but oh well, like my kids will notice?

The Flange:  This was a fun little skill to add to my back pocket.  When used in certain situations, I think it gives just a little needed pop.


Quilt Stats:
Name: Charmed and Fussy Cut
Size: 47" x47"
Design: Charmed Prints Quilt Along, designed by me
Fabrics:  assorted charms from GXQ Japanese Imports and Spoonflower Fabric Swaps
Piecing: Me
Quilting: Me -  Stipple on my home machine


Charmed Prints QAL: Quilting and Flange Binding

Well, here we are!  The last post for the Charmed Prints Quilt Along.  Are you ready to finish these puppies up?

BACKING:  Depending on whether you like one continuous fabric used for the back or a pieced scrappy back, there are a lot of options.  Unfortunately, I almost always run out of steam by this point, and usually cannot fathom piecing a second quilt top for the backs of my quilts.  For my quilt, I chose to use a super cool Japanese print featuring Anpanman.  Anpanman is a celebrity cartoon show for kids in Japan and has a million different types of merchandising products.  My friend brought this fabric from Tokyo's Fabric-town giant Tomato for me this summer.

Whichever method you choose for making your quilt back, be sure to make the back 3-4" larger than your quilt top in all directions.


BASTING:  Now that our quilt top is done,  we have arrived at my most dreaded step in the whole process.  Basting.  Ack.  Gotta do it!  I know that spray basting has been popping up a lot lately and I've used it on smaller quilts such as this one.  But for now, breathing any extra fumes just will not do for the growing baby!  So it's on my hands and knees with pins that I am basting.


QUILTING:  On to some fun!  Now that your 3 layers are basted together, you can begin to contemplate how to quilt them together.  For a long while, I considered myself a beginner and ventured no further than straight line quilting.  Minimal, at that.  Honestly, this was only a year ago!  If you have the patience, there are some fantastic straight line designs you can try.

Then I built up my courage and ventured into free motion quilting.  I would still consider myself learning in this area.  I've mastered stippling on my home machine and use loopy "Ls" on the mid-arm machine at my LQS.  There are so many things to learn and practice here!  I've found my comfort zone for now though, and am stippling this baby quilt as well.  After all, I want my own QAL quilt to look spectacular, right?

FLANGE:  Add some flair!  Sometimes when I finish a quilt, I like to use the same fabric for binding as I do for the last border.  On this particular quilt, I wanted to add something a little flashy and fun in between.  The flange on the quilt binding was a new-to-me technique, although I have added flanges on blocks for in the Rockin' Robin QAL and really enjoyed them then.


BINDING:  Most of the time I am in a great hurry to finish up a quilt.  This time, since I used the new flange, I decided to put my binding on the traditional way - stitch to the front, turn and hand stitch to the back.  Most of the time, I'm a machine stitch all the way type of girl, but I really wanted the binding to look perfect.  (I decided a while ago, I am hanging this quilt up and am not letting it be the pukey playmat for the floor)


Gen X Quilters

Next week, I'll be showing off the finish photos of my own quilt for the Charmed Prints QAL.

Charmed Prints QAL: Assemble the Quilt Top

This week in the Charmed Prints Quilt Along, we have made all our feature blocks and are ready to assemble the quilt top.

Gen X Quilters
Have you arranged, rearranged, and moved all the squares a bunch?  Well, if you're like me, you've played with the layout quite a bit.  Here is a photo of my final selections.  I've moved positions on many and even completely swapped out some of the charms I had initially chosen.

This is my final answer.


Once you're comfortable with your layout, let's get moving on the sashing.

1.  For each row, sew a 2 1/2" x 5" sashing strip in between each charm as shown in Figure 1 below.  

Start by stacking your charms, with the left most charm on top and the right most charm on the bottom, keeping your preferred order.  Make sure to keep them oriented correctly, if any of your fabrics are directional.  And keep the rows separated.  

Place one sashing strip, right sides together, on the right edge of your charm and sew a scant 1/4" seam.

Repeat all the way down the row stack until you reach the last charm.  Chain piecing really helps keep your rows in order at this step.  Do not add a 2 1/2" x 5" sashing strip to the last charm in your row.

Clip your chain piecing threads, making sure you keep your rows in the correct order.  Press seams.

Continue chain piecing and pressing until your row is complete.  Repeat the above process for all of the rows.  

Figure 1:  Sashing in between Charms in rows

2.  Now add a widthwise sashing strip to the bottom of each row (with the exception of the top row).  You should have cut 7 strips 2 ½” x 37 ½ “ for the child size quilt or 10 strips 2 1/2" x 57" for the lap quilt.  Sew the strips to the bottom of each row unit from step 1 using a scant 1/4" seam.  Press toward the sashing.

Figure 2:  Adding sashing to bottom of rows


3.  For the top row, add a sashing strip to the bottom AND top of that row.
Figure 3:  Add sashing strip to bottom AND top of TOP row

4.  Piece all rows together using a scant 1/4" seam.  At this point, your quilt top will look like Figure 4.
Figure 4:  Piece all rows together

5.  Add the last 2 remaining sashing strips vertically to the unit from step 4.  Sew using a scant 1/4" seam and press.
Figure 5:  Add 2 vertical sashing strips

6.  Add Borders:  Sew the two 3 ½” x 41 ½ ” (3 ½” x 61" lap) horizontal strips first as in Figure 6.   Press toward the border.
Figure 6:  Sew horizontal border strips

7.  Sew the two remaining vertical strips to finish the quilt top.  Press toward the border.
Figure 7:  Sew vertical border strips

Charmed Prints QAL Complete Top


Can't wait to see your lovely tops!